Basics of understanding someone else's AI code
You'll eventually face a moment where you're going to have to read through an (at-first) complicated set of AI code. You might need to leverage another expert's repo in order to build an experiment. You might be in a company, and found a great repo with the exact algorithm you're looking for. You just might be curious about how a specific method works after reading a paper or blog post, and you want to try it out. Regardless, when you first see the code, at least for me, it can be overwhelming - you don't know where to begin.
After many years of going through this exercise, I was inspired by my latest project diving into code for this paper Counterfactual Generative Networks by Sauer and Geiger at ICLR 2021, as well as this paper Dynamic Routing Between Capsules by Sabour, Forst, and Hinton at NeurIPS 2017. I'm curious about how I can apply both towards some thermal images of various facial poses. As a result, I dug into their code and came up with a few tips to share with you, about how to get started dissecting code and understanding it. The repositories I'm using are https://github.com/autonomousvision/counterfactual_generative_networks for Counterfactual GAN and https://github.com/adambielski/CapsNet-pytorch for Capsule Networks. Both are excellently documented and run with few issues.
TLDR;
- Try to read the most detailed explanation of the code that you can find. Often times this is a paper.
- If you can, "shop around" for the right repo.
- Make your own comments and print out shapes of tensors.
- Become friends with their Dataloader.
- Define a manageable goal and celebrate it.
- For model debugging you may want to keep on the side, a Jupyter Notebook to reproduce errors without running the entire script.
First, try to read the most detailed explanation of the code that you can find. Often times this is a paper. But back when I was at Booz, despite having very little time in our day, the AI engineers always found time to read the original paper. I recall fondly a time when we were implementing Siamese Networks for object tracking. They read the paper in bits over lunch, between calls, at night, on the elliptical (yes!), and on the train (pre-Covid) - even if it was just pulling out the most important parts. I think this goes directly to the point of understanding what you're about to code. The more complex the code-base, the more you should really try to understand as much as possible about the methods. Because, each method will be encoded as functions and classes. Nowadays, I think that with greater AI competition across industry, data scientists and engineers should indeed invest their time to read academic papers. It may seem daunting at first, but I know from experience, it goes faster and faster as you read more and more. In the beginning, break it out into chunks. Maybe even work as a team and find the math person, the code person, the methods person, the theory person, etc., to help break it down. You'll be rewarded by having greater clarity when examining the code.
Second, if you can, "shop around" for the right repo. As the code base grows more complex, you'll have to "account" for many nuances that are out of your control - the style of the programmer, the libraries they use and the ones you're familiar with, how easy it is to follow the code, and their level of documentation. For me, I often "shop around" quite a bit until I make a decision on the final repo I want to use. Of course, if it's a brand new, original paper there is usually only one repository at first - what I faced with the Counterfactuals GAN paper. But with the CapNet paper, since it was implemented in 2017, there are several repositories four years later. If I have options like this, here are some of my criteria:
- I usually chose the most simple, minimalist implementation. For example, I really like this person's GAN implementations. They're extremely easy to follow, each GAN almost follows the same "recipe" and as a result, you can understand the programmer's logic. As you "master" one script, you can decipher the others: https://github.com/eriklindernoren/PyTorch-GAN. For me, having a simple code base means that I can troubleshoot errors faster, and I can understand the bare bones and fundamental code that comprises the entire algorithm.
- It is true, I look at the number of Github stars. It's more of an indicator to me about how interpretable the code is, and a measure of quality and usability. I'm sure there are many programmers with excellent code, but just not a lot of popularity. It's not a popularity contest, but with my limited time, I'd like to use one that has reported issues and bug fixes. This point is really important to me. I always look under the issues first, to see if the authors has already replied with a solution to any problems I might be having. Even if they don't, I still try to take the time to do my own troubleshooting and bug-fixing before I post an issue.
- A good README. Without any details about how to install and run the first "hello world" of the script, it's impossible to figure out what to do. I think this goes hand-in-hand with Github stars. But the quality of the README file will probably be a direct predictor of how well I can get through the code. An awesome README file I found was when I was working on person re-identification https://github.com/KaiyangZhou/deep-person-reid. There are so many excellent pieces of documentation on Zhou's repo, above and beyond such as code, documentation, how-to-instructions (user guide), a model zoo, and the original paper! This is an extraordinary amount of information, but following this really helped me get jump started.
- A Jupyter notebook. It's my last criteria, and not that necessary. But, if the author has supplied a super easy, super simple, example in a notebook, it's the primary place I start just for some initial investigation. Some repos can't offer a notebook due to the nature of their code, but many do find a way and this makes it easy, since a lot of explanations are peppered throughout the notebook.
- Of course, your preference of DL framework. I used to use Tensorflow a lot. But for the past two years I've been using PyTorch so much, I don't think I remember Tensorflow/Keras anymore! So, I'm usually trying to find PyTorch relevant repos. Although if I'm really stuck, I'll go for Keras if the repo fits the other four criteria I previously laid out. Essentially, this is your preference and what makes you feel comfortable and set up for success.
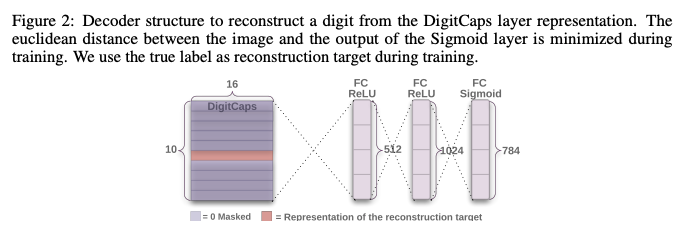
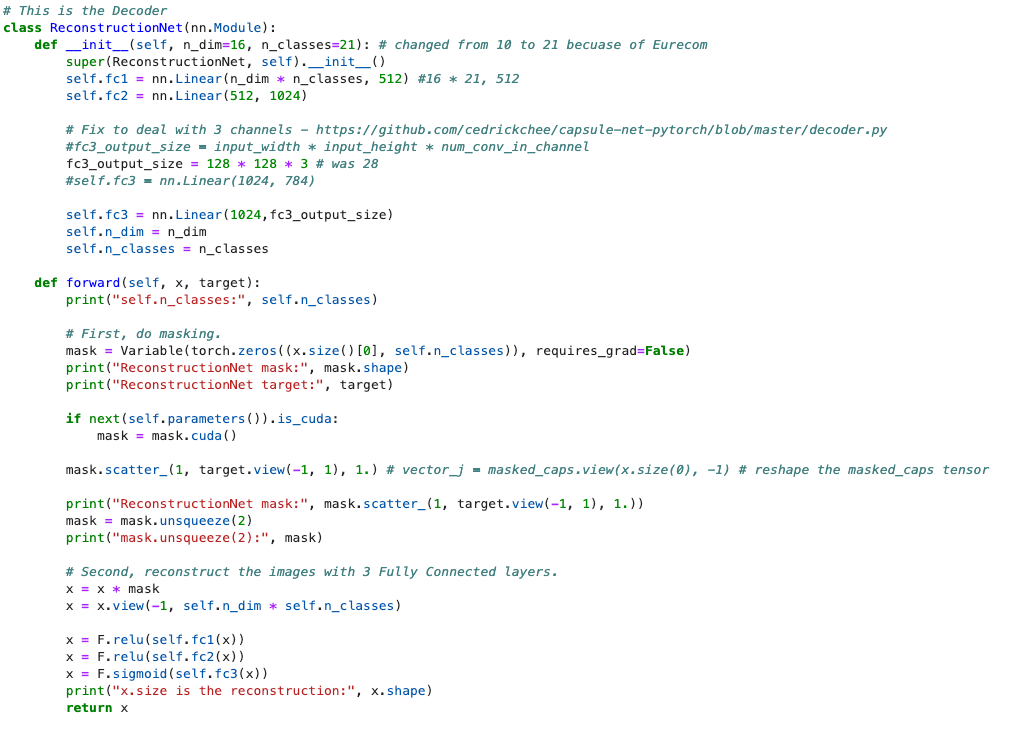
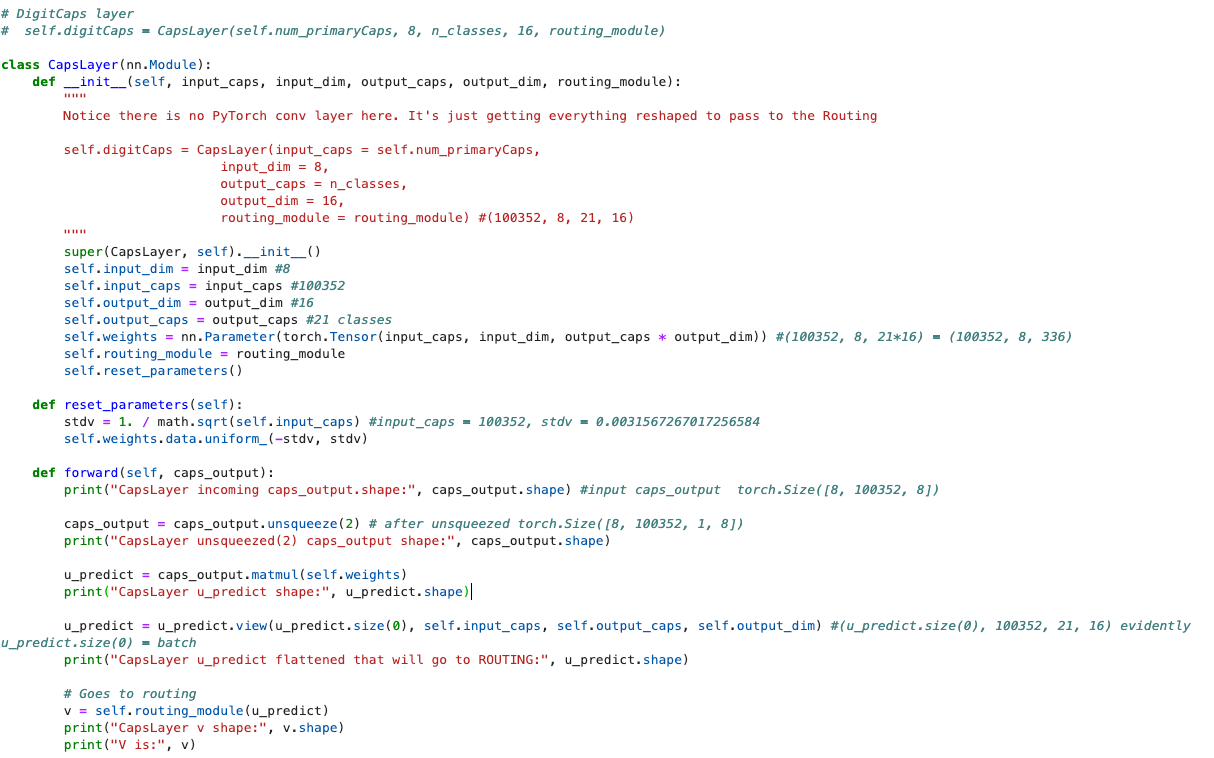
Third, make your own comments and print out shapes of tensors. I see this as the process of accepting that this is the code you're going to modify - so, make it your own. Because there's so much to keep track of, it helps to write comments about how the code works. In the below figure, I made a note that this CapsLayer has no convolutional layers, it's just a sequence of reshaping and routing to other functions - in this case, passing a tensor to another function that handles the "routing by agreement" algorithm. You'll also see I print out a lot of shapes via .shape. What ends up happening is that if I stop the process in terminal, I can kind of figure out what tensor caused which problem like matmul errors, tensor type errors Expected object of scalar type Long but got scalar type Float, and errors like this RuntimeError: Expected 4-dimensional input for 4-dimensional weight [64, 3, 4, 4], but got 2-dimensional input of size [1, 196610] instead.
Fourth, become friends with their Dataloader. Now I'm writing this from the perspective of PyTorch. But it doesn't matter what framework. It all starts with the data. And it can all STOP with the data, too! These are the data loading things I spend a lot of time on for the first few days, actually:
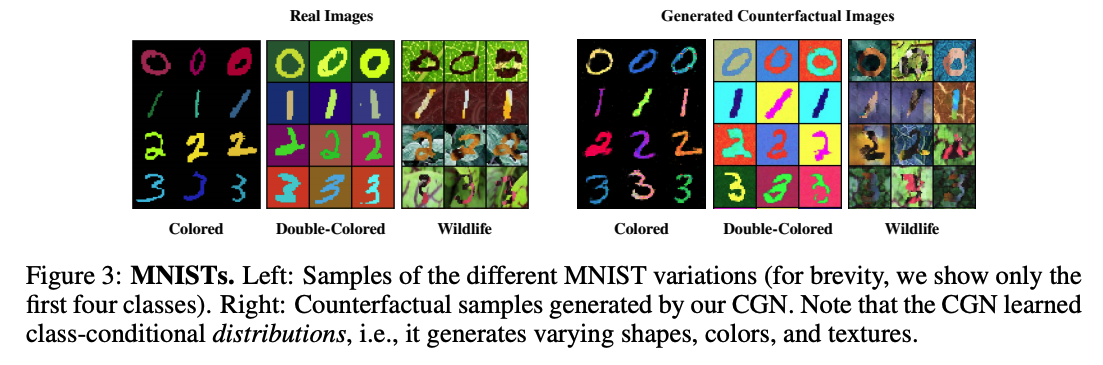
- Understanding what data was used and for what reason. For example, the Counterfactual GAN authors use full-color (read RGB not L grey-scale) MNIST images because they need to understand if a model relies on foreground and background color and texture. So given this knowledge, preprocessing my data into RGB will be necessary. This is completely different than CapsNet which uses regular MNIST in the grey-scale version directly downloaded
from torchvision import datasets.
2. Deciphering how they load data. Dataloaders can be really complex, in my opinion! I usually write my own custom dataloader classes like the below.
class ImageDataset(Dataset):
def __init__(self, annots_csv, root, transforms_=None, mode="train"):
self.transform = transforms.Compose(transforms_)
self.annots = pd.read_csv(annots_csv)
self.files = sorted(glob.glob(os.path.join(root, mode) + "/*.*"))
if mode == "test":
self.files.extend(sorted(glob.glob(os.path.join(root, "test") + "/*.*")))
def __getitem__(self, index):
data = Image.open(self.files[index % len(self.files)]).convert('RGB')
data = self.transform(data)
target = self.annots.iloc[index, 1] #the label is the second col
target = np.array([target])
target = torch.LongTensor(target)
return data, target
def __len__(self):
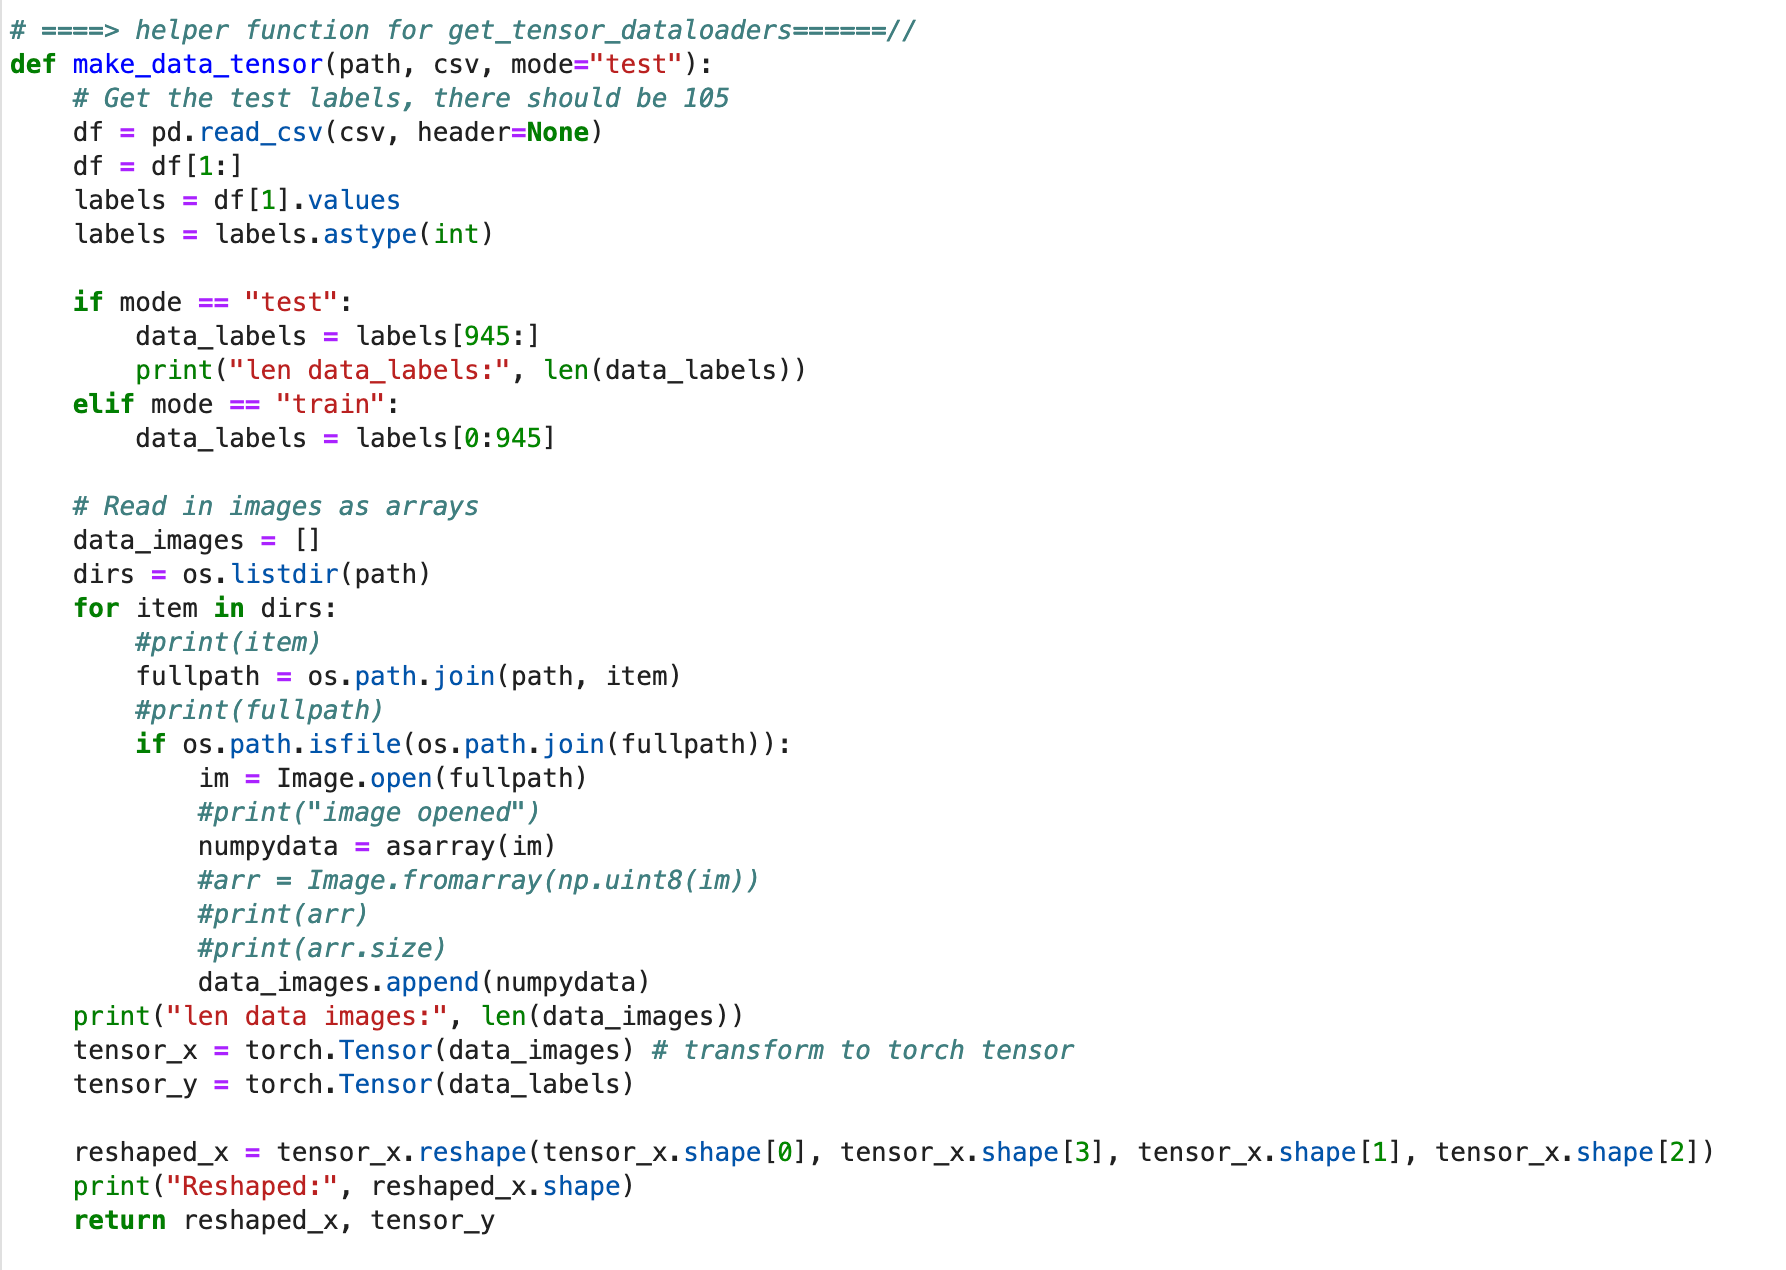
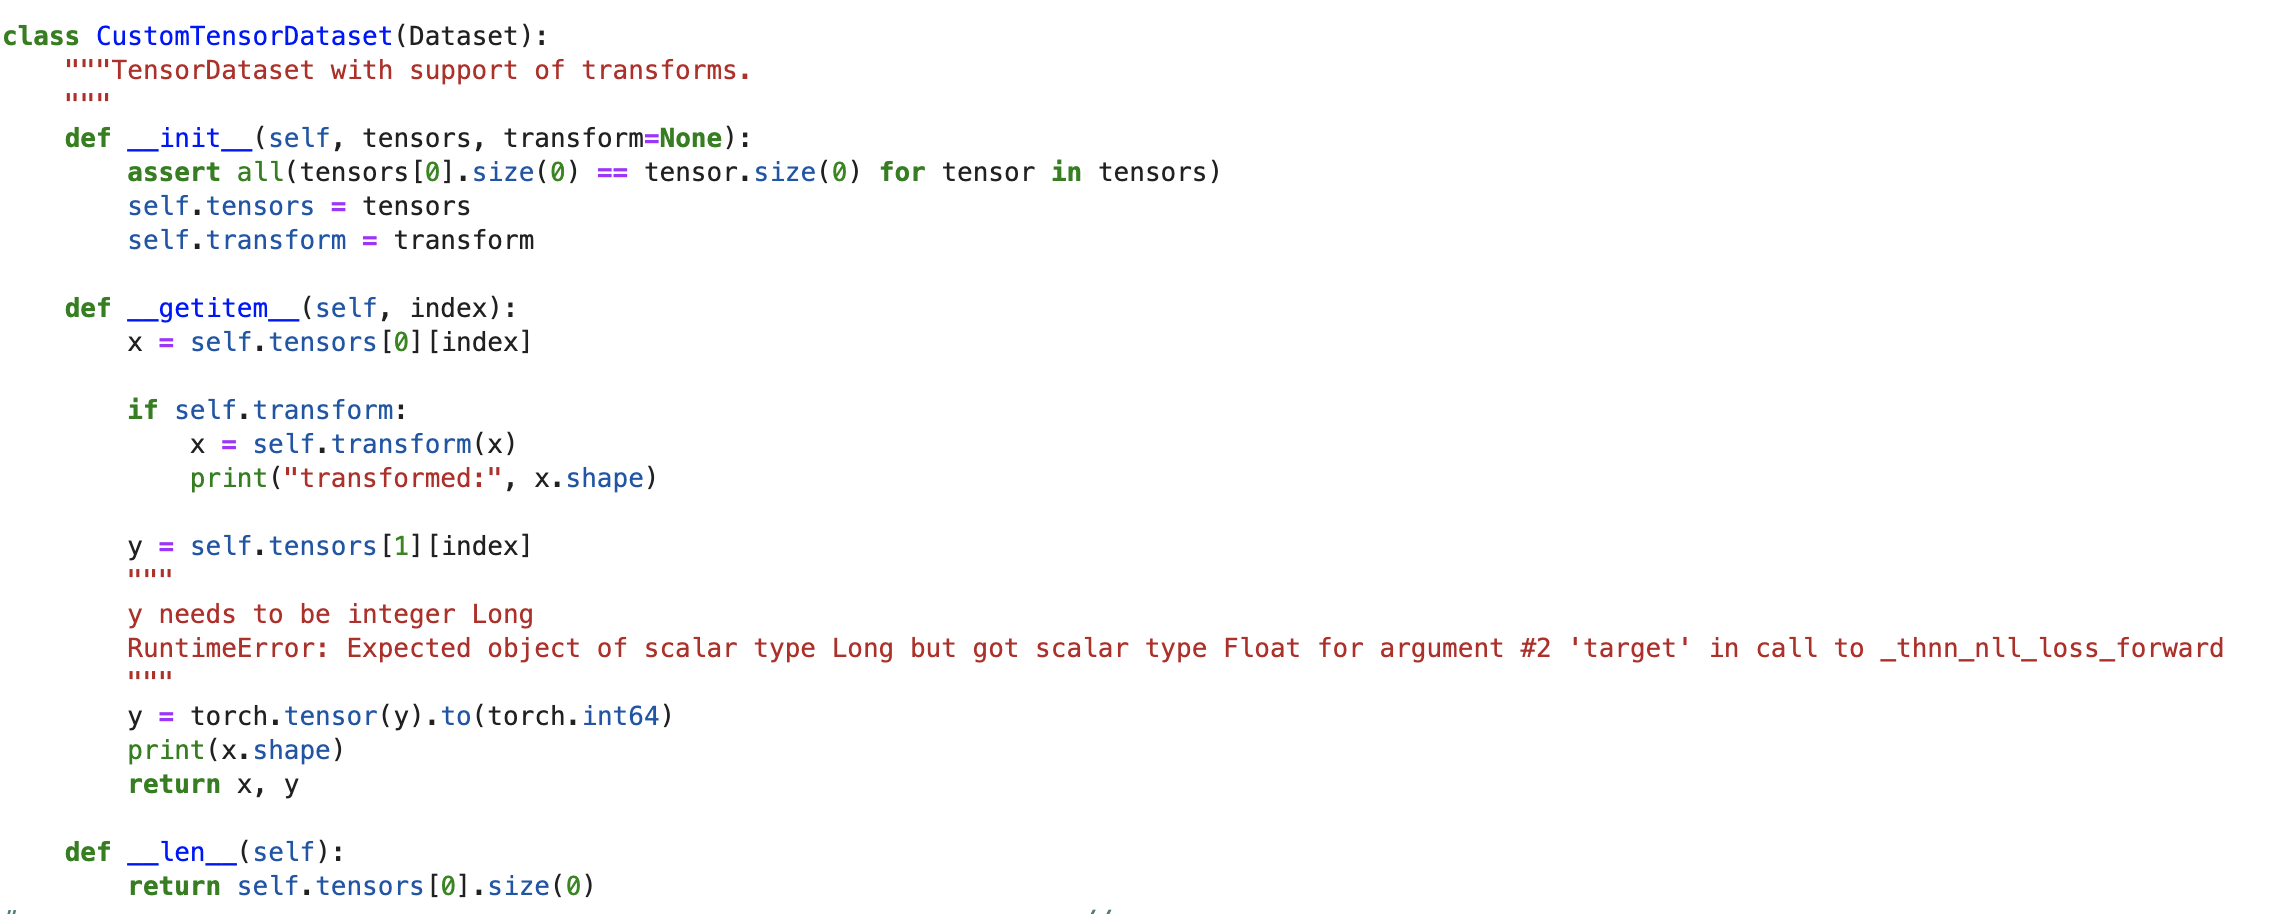
return len(self.files)3. You may need to write a custom dataloader for your own custom dataset that will mesh with their dataloader. This isn't a trivial task and I've found myself, like I said taking a few days to figure this out. I usually end up modifying their dataloader.py in a way that will get my image, label, and transformations for my dataset. For example, in the Counterfactual GAN implementation, after the counterfactual image is generated, you can train an invariant classifier. But this calls for a new data structure than what I originally used - which is a TensorDataset. This required me to write additional helper functions to supply the train and test datasets as tensors.
Fifth, define a manageable goal and celebrate it. This mind sound like project management stuff (because it is!), but it is absolutely important that you wrap your mind around what can be achieved. This is one reason I always choose (if possible) the simplest repo, first. If the repo I have at hand is the only one, and not the simplest, I try to make very simple goals like:
- Get the code to run. Even if I don't understand all the code behind the scenes. Just get it to run. This means at least your environment is set up correctly and by process of elimination, you can now start to change code here and there - revert back to the original code base if things go sideways.
- Load my dataset correctly. By using print messages I can track if my data has loaded correctly, even if I get an error. You'll see below I already added print statements for
print(loaded CNN model...),Eurecom_counterfactual ds_train loaded., etc. These help me understand that at least this part of the code is running right.
(gans) cordun1@is-server-043:~/experiments/causality/counterfactual_generative_networks/mnists$ python train_classifier.py --dataset Eurecom_counterfactual --batch_size 8 --out_file eurecom_counterfactual_bs8_100 --epochs 100
Namespace(batch_size=8, dataset='Eurecom_counterfactual', epochs=100, gamma=0.7, log_interval=100, lr=0.001, out_file='eurecom_counterfactual_bs8_100')
loaded CNN model...
Eurecom_counterfactual ds_train loaded.
len data_labels: 105
len data images: 105
Reshaped: torch.Size([105, 3, 256, 384])
Eurecom ds_test loaded.
Dataloaders ready...
loaded dl_train and dl_test...
Train Epoch: 1 [0/100000 (0%)]  Loss: 2.330192
Train Epoch: 1 [800/100000 (1%)]        Loss: 2.307751
Train Epoch: 1 [1600/100000 (2%)]       Loss: 2.340716
Train Epoch: 1 [2400/100000 (2%)]       Loss: 2.288863
^CTraceback (most recent call last):
  File "train_classifier.py", line 113, in <module>
main(args)- Get a baseline model to run. I mean, this is what you came for, right? To run this glorious AI model. If you can run the most basic model, even if the loss and accuracy kind of suck... but it runs... now you have something to go off of.
Sixth, for model debugging you may want to keep on the side, a Jupyter Notebook to reproduce errors without running the entire script. I usually name it "debug.ipynb" or "explore.ipynb" or something to this effect, in an attempt to work out problems using simulated data. I don't need to necessarily load in the image (as an example of a data point). Instead, I can make a random tensor like this that will serve my debugging purposes.
img_A = torch.randn(3, 256, 256) # Image A
img_B = torch.randn(3, 256, 256) # Image B
img_input = torch.cat((img_A, img_B), 1) # by dim = 1 -> this adds it up to be 512 x 256
img_input.size()
I can also use the notebook as a quick way to understand how various layers of the model torch.nn.Embedding works:
emb_layer = torch.nn.Embedding(1000,50) #n1, d1
x = torch.LongTensor([[1,2,4,5],[4,3,2,9]]) # 2, 4
y = emb_layer(x)
y.size()
Another example is to use the notebook as a way to check functions I've written like the effect of a linear transformation:
latent_dim = 256
h = w = 256

fc = nn.Linear(latent_dim, h * w)
print(fc)

batch = 1

labels = torch.FloatTensor(np.random.randint(0, 2, (batch, latent_dim)))

# ^^ doing that is wrong because it means there are 256 labels per image
# that's wrong, it should only be one label - 1 or 0

print("original labels:", labels)
print("labels.size:", labels.size())
print("labels.size(0):", labels.size(0))
print(labels)
labels = fc(labels).view(labels.size(0), 1, h, w)
print(labels.size())

x = torch.randn(1, 3, 256, 256)
d1 = torch.cat((x, labels), 1)
print(d1.size())
And then also debugging loss functions.
auxiliary_loss = torch.nn.CrossEntropyLoss()

pred_label = torch.randn(2, 2, dtype=torch.double)
real_aux = torch.randn(2, 2, dtype=torch.double)
fake_aux = torch.randn(2, 2, dtype=torch.double)
labels = torch.LongTensor(np.random.randint(0, 2, (2, 1)))
gen_labels = torch.LongTensor(np.random.randint(0, 2, (2, 1)))

# criterion(input, target)
gen_labels = gen_labels.squeeze_()
label_loss = auxiliary_loss(pred_label, gen_labels)
print(label_loss)

fake_label_loss = auxiliary_loss(fake_aux, gen_labels)
print(fake_label_loss)

labels = labels.squeeze_()
real_label_loss = auxiliary_loss(real_aux, labels)
print(real_label_loss)

>> tensor(0.5362, dtype=torch.float64)
>>tensor(1.0325, dtype=torch.float64)
>>tensor(0.9492, dtype=torch.float64)
All of these tips are of course, not exhaustive. There are many other ways to understand someone else's code. Here are a few articles online that provide additional insights:


 William Shawn